Literally a month ago on this day was the release of what could be considered one of the most highly awaited Wii games. Super Smash Bro's: Brawl.
I got a few chances to play this, and I must say, this game falls short of what a fan could want.
In short this was Nintendo's game that only sells because fans eat up the fact that is has a lot of their favorite characters from all the Nintendo games (plus licensed to Nintendo character's now) in the same game ... that being said it is true this games controls are better then most movie games(the worst games constantly for fans of anything), but compared to them there really isn't much more to be happy about.
For starters they added a on-line multi-player mode, pretty sweet for any SSB fan. To bad if you play with Wi-Fi you'll lag out of the game or just lose because you can't control your character fast enough, and I have a feeling the wired experience won't be that huge jump in performance.
Second, the adventure mode while completely new, in short doses can be fun but overall is frustrating especially if you decide to play with a friend, and I have a huuuge beef with how zoomed in camera is in this mode, so much so you can't see anything going on, but while in melee every character (excluding GIANT TVs) everyone is the size of an ant because the camera stays so far out on every map.
So even newest features are a serious flop and even the change out in characters and other minor adjustments only make this game a glorified full price expansion pack to the SSB: Melee experience. Not worth it, unless your a hardcore fan. Save yourself the from the disappointment of lack luster addition to this series, skip this title.
April 9, 2008


April 8, 2008
A Month in Review: Olympus E-510

Around a month ago I was elated to be gifted my very first DSLR camera, The Olympus E-510.
This little camera I've come to really love. It's got everything a photographer could want from their very first DSLR.
First and for most my favorite feature, this little baby has built in image stabilization. Considering the lenses I'll be buying this feature works great, I haven't had a blurry image yet, and with this feature included I won't have to spend extra on lenses to have the feature included. That is a costly addition, for a college student and hobbyist, to any lens.
Next up is the sensor cleaning. The E-510 has self-cleaning image sensor. While eventually I'll probably have to clean it myself, I haven't seen any specks on my pictures. Because, every time I turn the camera off the sensor cleans itself, super simple. The sound of the cleaning process is a bit sickening though, kind of like the sound of a dying hard-drive. Just relax and read the manual if you don't believe me. Just the cleaning cycle.
Image quality should be touched on, seeing as that is a major factor for a camera. My thoughts: Awesome. I haven't been disappointed. The pictures, as long as they are adjusted appropriately and the focus is set, come out crisp and full of detail. The added DoF (from the 3/4 format) really are nice if you like landscape shots. The color quality is fantastic and usually true to life, but make sure to manually set the White-Balance for that because the automatic on this camera sometimes makes this a lot cooler then they need to be so you can easily end up with a lot of smurf people & land shots.

Other nice features of this camera are: 10 MP images, lots of preprogrammed shooting modes, mechanical auto-focus with the option for manual focus, the camera is lighter then most, feels and is durable, brand name lens (even kit lens) are high quality. This camera even has an automatic mode for people who are shy of the more manual settings.
Also the actual kit compared to the big two (Nikon and Canon) of a comparable camera is actually a cheaper option.
A bit of warning, this camera isn't for everyone. If you want one that has large amount of compatible lenses, you'd do better to buy a Nikon or Canon. Also the lenses for the Olympus camera's tend to be more expensive then the other two populars as well as harder to find in actually physical stores.
Other then that also be sure that there are some users who have complained the camera is too small in their hands or that the camera's LCD is to small for the resolution of the pictures it's taking, and I agree with that latter point, but I don't spend too much time chimping so it's not a problem to me. I only double check the screen previews every so often to make sure my white balance is ok.
All in all this is a wonderful camera for a first timer who is looking for something that is reasonably priced but has a forgiving learning curve but includes all the bells and whistles to make a pro feel confident.
March 28, 2008
Money makes the World go Round
So I've been MIA, so sue me. I've just been overwhelmed with school projects and my ever on-going job search, and yea I stopped to have fun personal me time... or just depressed me time too...
Anyways I've love a techie job, but at this point I'd be willing to take almost anything so long as it payed enough for me to move out. Why I want out of my home is personal, but I need out. I'm hoping for the in the next few months to be working on landing a place to live, if I can manage to snag a job very soon.
Wish me luck!
Anyways I've love a techie job, but at this point I'd be willing to take almost anything so long as it payed enough for me to move out. Why I want out of my home is personal, but I need out. I'm hoping for the in the next few months to be working on landing a place to live, if I can manage to snag a job very soon.
Wish me luck!
November 14, 2007
Power to the Apple Users
As many laptops users must know, having access to an outlet at a moments notice is pretty crucial to a long lived project. At my current campus it seems they forgot this and when they were building the NEW less then a year old building they put hardly any outlets in the commons areas they built. We're talking 20-30 seats to every outlet. That could leave a lot of laptop users SOL and it seems almost every student has one now-a-days.
Onwards to my rant. This very impolite individual came up with her Apple Laptop. If you know nothing about Apple laptops then I'm telling you the power cables have very large ends, and if plugged in improperly can cover the second socket. How dense do you have to be in a public area with other laptop users to cover and waste a socket. I guess it's because Apple users are to busy running their mouths about how great their apple is that they don't have time to have an intelligent thought like "Wow, someone might need that other socket, better be polite and make sure it's open because I know my unit does not generate enough pull to have a need to block the other socket."
But hey, most people will be like "Mindless whining about a laptop about to die," and perhaps it's true but that just rubbed me the wrong way today and it reminds me of how much I am annoyed by rude cell phone users.
Onwards to my rant. This very impolite individual came up with her Apple Laptop. If you know nothing about Apple laptops then I'm telling you the power cables have very large ends, and if plugged in improperly can cover the second socket. How dense do you have to be in a public area with other laptop users to cover and waste a socket. I guess it's because Apple users are to busy running their mouths about how great their apple is that they don't have time to have an intelligent thought like "Wow, someone might need that other socket, better be polite and make sure it's open because I know my unit does not generate enough pull to have a need to block the other socket."
But hey, most people will be like "Mindless whining about a laptop about to die," and perhaps it's true but that just rubbed me the wrong way today and it reminds me of how much I am annoyed by rude cell phone users.
Ipod Explosion
Ever see those exploded diagrams of something? Say like the inner workings of an Ipod? Some fan of the diagrams decided to make his own and decided he wanted to use his Ipod. Funny thing is, he made sure it still worked even in the diagram.
I recommend checking it out, his post included pictures of his work, though he sadly thought it was flawed, because of a few mishaps. My only hope is that he'll make another one of something equally interesting.
Exploded Ipod Still Works
I recommend checking it out, his post included pictures of his work, though he sadly thought it was flawed, because of a few mishaps. My only hope is that he'll make another one of something equally interesting.
Exploded Ipod Still Works
November 13, 2007
FFXI Subtle Advertising
So I'm really stoked and ready to run to the store to buy my copy of Wings of the Goddess when if finally releases later this month. It is the newest Expansion to Final Fantasy XI if someone was wondering. I'm a really big fan of the game.
Anyway back to the purpose of the post, while I was out browsing Big Lots I found a product that made me laugh because the name of it shares the name of a monster in FFXI.

Anyway back to the purpose of the post, while I was out browsing Big Lots I found a product that made me laugh because the name of it shares the name of a monster in FFXI.

June 21, 2007
Must see parody
This video is a parody of the microsoft surface commercial/promo. It's way to funny no matter if you like microsoft's stuff or not.
PS: I know it's been a super long time since my last post :p, so what spam me for it.
PS: I know it's been a super long time since my last post :p, so what spam me for it.
June 10, 2007
Wii Time Fun
 Good day everyone who happens to be a wii fan. Today's post is just for you. I was out this weekend with some friends at a local music festival and walking to the gate we happened to see this truck (picture to the left in case you didn't see it some how. parked out there.
Pretty cool huh? Apparently that truck is officially licensed because inside the event there was a wii entertainment trailer set up to promote the wii even more. Yay, Nintendo. I'm going to assume that's the truck that hauls the trailer around from event to event around the country or at least the south.
In other wii news, be sure you take a break when playing the wii because apparently there is a new medical condition that comes from the soreness from little breaks, no stretching and over playing. Wiiitis. Yeah real technical sounding *cough cough*, but I wouldn't recommend going to the doctor about it, he'll only prescribe over the counter pain killers and recommend you avoid wii play for a week....like I need a doctor to figure that one out for me.
June 4, 2007
Keyboard Prank
Until I can find another article to write about or give a geek tutorial (Yes I will take questions and answer them the best I know how) Enjoy this video that shows how to play a nasty prank on someone by tampering with their keyboard.
Here are the more detailed instructions on how to set up the prank.
Here are the more detailed instructions on how to set up the prank.
June 1, 2007
Automatic Touch-Ups for photos in Photoshop CS2
How to Touch-Up Digital photos in Adobe Photoshop CS2 the painless tenderfoot way:
This guide is intended to be used by persons who have VERY little knowledge of Photoshop and its complete capabilities and this is a nice launch pad to help improve home photos until said person learns the ins and outs.
NOTE: This guide can work in versions below CS2 though 6 and below the menus could quite possibly look different.
If you’re reading this guide and are anything like me, you have a digital camera and love to take pictures, the only problem is, and sometimes digital cameras can take really disappointing pictures in poor quality lighting or conditions. So if you want to preserve memories well, it’s important to own a good photo editing software to go with any kind of digital camera.
Automatic and Painless Way:
Step 1) Find and open the photo you want touch up.
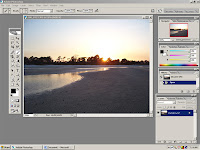
Step 2) Ok so you’ve managed to find the picture and open it, the menu’s seem scary, but bare with me. Just go to Image Tab and click on it and then go to adjustments, for this guide’s purposes we are only going to use the auto features.
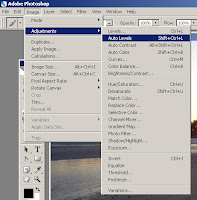
Step 3) Now on the sub menu adjustments let’s start with auto levels. Just click it and compare the two images. If it didn’t improve your picture, just go to edit step backward. And boom it’s back to normal.
Step 4) Now in the adjustments menu use Auto Color, you be the judge on the improvement made if any. And again just step backward if the image became less attractive.
Step 5) The last auto adjustment is auto contrast, this is normally only used is the photo came out way to bright or way too dark, so if you think the lighting is perfect move on if not just click auto contrast.
OOOK, so we’ve done all that, but something doesn’t seem quite armature photographer enough about it? Maybe you have too much “dead space in your picture.”
Let’s Crop it a little. Just remember with photos things are more appealing in a rule of three fashion. That means any item unless it is the COMPLETE FOCUS of the shot, should not take up more then a 1/3 of the picture.
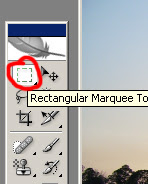
Step 6) To start things off click on the rectangular marquee tool on your tool bar.
Now this is important if you want prints make sure on the upper bar on style you have fixed aspect ratio picked. The ratio you should use is 4 x 6 or 6 x 4 depending on if you have a vertical or horizontal picture.

Ok so you’ve done that and will the rule of 3 in mind figure out what you want in the picture. I want the sun, because as you can see I have way to much width and sky. So use the marquee to mark the area you want.
With the selected area all highlighted with the dotted line head on up to the image menu and scroll down to crop and click it.
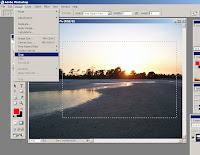
Alakazam and now you only have the selected area as the whole photo.
Now it’s time to save the file, but do make sure you click save as so you don’t over write the original. ESPECIALLY if you cropped the image.
And here is a comparison of two of another image that took on a more noticeable difference with the auto-correction better than the one I happened choose to screen cap for the tutorial:


This guide is intended to be used by persons who have VERY little knowledge of Photoshop and its complete capabilities and this is a nice launch pad to help improve home photos until said person learns the ins and outs.
NOTE: This guide can work in versions below CS2 though 6 and below the menus could quite possibly look different.
If you’re reading this guide and are anything like me, you have a digital camera and love to take pictures, the only problem is, and sometimes digital cameras can take really disappointing pictures in poor quality lighting or conditions. So if you want to preserve memories well, it’s important to own a good photo editing software to go with any kind of digital camera.
Automatic and Painless Way:
Step 1) Find and open the photo you want touch up.

Step 2) Ok so you’ve managed to find the picture and open it, the menu’s seem scary, but bare with me. Just go to Image Tab and click on it and then go to adjustments, for this guide’s purposes we are only going to use the auto features.

Step 3) Now on the sub menu adjustments let’s start with auto levels. Just click it and compare the two images. If it didn’t improve your picture, just go to edit step backward. And boom it’s back to normal.
Step 4) Now in the adjustments menu use Auto Color, you be the judge on the improvement made if any. And again just step backward if the image became less attractive.
Step 5) The last auto adjustment is auto contrast, this is normally only used is the photo came out way to bright or way too dark, so if you think the lighting is perfect move on if not just click auto contrast.
OOOK, so we’ve done all that, but something doesn’t seem quite armature photographer enough about it? Maybe you have too much “dead space in your picture.”
Let’s Crop it a little. Just remember with photos things are more appealing in a rule of three fashion. That means any item unless it is the COMPLETE FOCUS of the shot, should not take up more then a 1/3 of the picture.
Step 6) To start things off click on the rectangular marquee tool on your tool bar.
Now this is important if you want prints make sure on the upper bar on style you have fixed aspect ratio picked. The ratio you should use is 4 x 6 or 6 x 4 depending on if you have a vertical or horizontal picture.


Ok so you’ve done that and will the rule of 3 in mind figure out what you want in the picture. I want the sun, because as you can see I have way to much width and sky. So use the marquee to mark the area you want.
With the selected area all highlighted with the dotted line head on up to the image menu and scroll down to crop and click it.

Alakazam and now you only have the selected area as the whole photo.
Now it’s time to save the file, but do make sure you click save as so you don’t over write the original. ESPECIALLY if you cropped the image.
And here is a comparison of two of another image that took on a more noticeable difference with the auto-correction better than the one I happened choose to screen cap for the tutorial:


Subscribe to:
Posts (Atom)